There are literally millions of eyeshadows looks being shown off on a daily basis by beauty influencers across YouTube, Insta and Facebook, yet many of them fall into one of six main techniques.
From sharp-cut creases to soft smokey looks, once you’ve nailed these basic eye makeup looks, the only limit is your imagination.
We do, of course, use the word “basic” loosely because these techniques are far from easy. If they were, there wouldn’t be as many tutorials as there are teaching people how to master them. Remember, there’s a reason why people are called makeup artists.
We should also point out these eyeshadows will look different depending on your eye shape. There are six eye shapes and certain eyeshadow looks are easier – or harder – based on which you have. This also influences how you do eyeliner, among other things, so it’s worth reading our What eye shape do I have? guide to find out which will suit you best.
Below we’ve outlined some of the main eyeshadow techniques from some of our favourite influencers and brands to help give you some eyeshadow ideas and to help you nail the techniques, we recently spoke to leading makeup artist Victoria Howe to learn how to apply eyeshadow for different eye shapes. Plus, check out our best eyeshadow palettes list and our What eyeshadow goes with your eye colour? guide.
Feel free to scroll through these eyeshadows looks, for inspiration, or you can jump straight to the desired look via the links below:
Before we dive in, we wanted to talk a bit about what you need to nail these eyeshadow looks. We’re not saying you should buy all of these items, but if you want to really get to grips with eyeshadow, there are a few things it’s great to have.
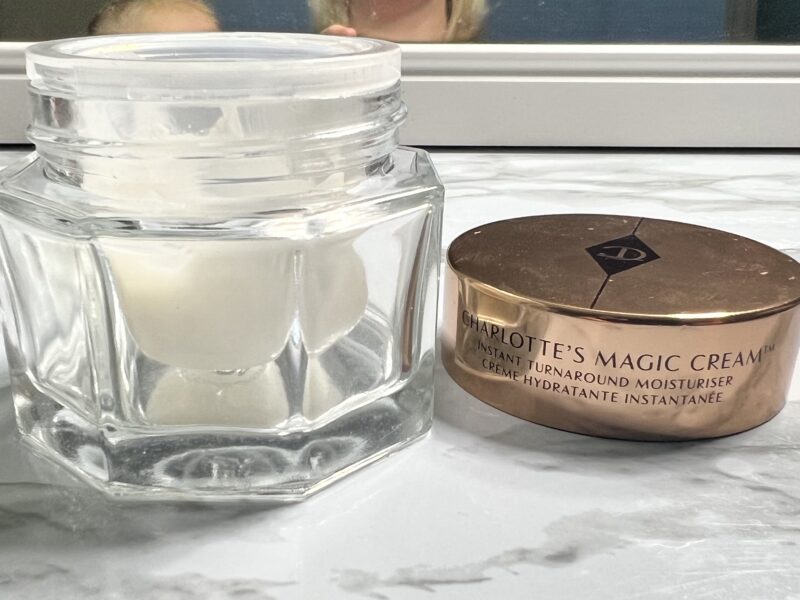
Eyeshadow is the main one (obviously), but don’t think you have to stick to traditional eyeshadow palettes. We love cream eyeshadows and pencil eyeshadows – especially if we’re in a rush. Sweep it on, blend it out and you’re done. The Charlotte Tilbury eyeshadow range has several cream versions, in shimmer, glittery and matte, and there are some great eyeshadow sticks. Take a look at our best eyeshadow palette list for more inspiration.
Eyeshadow brushes. It is possible to use your fingers to apply eyeshadow and if you want to get a deep shimmer, sometimes this is the best way to apply the pigment. It’s certainly the easiest way we’ve found to apply cream eyeshadows. Alas, fingers don’t bring a huge amount of precision, and that’s where eyeshadow makeup brushes come in.
We use the rule that the darker the colour, the smaller the brush. We don’t get too bogged down in the shape of those brushes, just that the smaller ones are more precise for packing on pigment, while larger brushes can be used for lighter, sweeper colours.
Blending brushes. These are typically larger, fluffier versions of eyeshadow brushes and are softer. They’re used to soften the edges of any harsh lines you’ve created with your eyeshadow and to blend two colours into one another.
Eyelid primer. If you’re already on the primer bandwagon when it comes to your face, you’ll know what a difference it can make in terms of how well your makeup stays applied. The same goes for eyelid primers. In fact, they’re even more important because your eyes are the part of your face that moves the most during the day, and it’s covered and surrounded by creases. We recommend the Urban Decay Eyeshadow Potion (£19), or the NYX Professional makeup Pigment Primer (£8). We also swear by the P.Louise bases. You can either use the skin tone-coloured bases to create a blank canvas, or use the coloured bases underneath corresponding shadow, in order to make the colour pop.
Concealer. Concealer plays a big role in a number of these eyeshadow looks and it’s worth buying one that is a shade lighter to really lift your look. Check out our best concealer page for recommendations, or our how to find a foundation match to discover what shade you need.
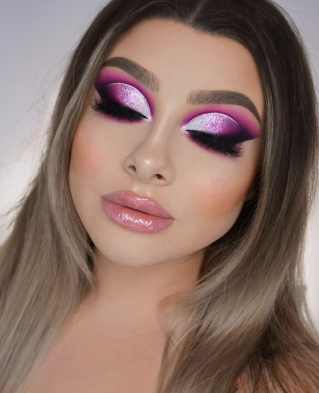
FURTHER READING: Our fave pink eyeshadow looks for all budgets and skill levels, from beginners to pro
No matter if you’re going for the soft cut crease look or the full shebang, this is one of the hardest, but most impactful of eyeshadow looks.
It is especially great for people with hooded eyes or monolids as it creates the illusion of a deeper eye socket by drawing on a fake – and if you really want it to pop, then exaggerated – crease.
Not sure what eye shape you have, check out our What eye shape do I have? guide.
The technique behind this look involves applying eyeshadow all over before using concealer to block out certain parts of the eye.
You then put a lighter, or different colour, eyeshadow where you’ve put concealer to create a sharp definition between the two colours.
The stronger the contrast between the colours, the bigger the impact, but this look can also work with more subtle shades – particularly if you’re looking for something a little softer for work, or a date.
You can cut the crease with concealer straight on top of your eyelid, or you can clear the lid of any and all product before going in with your new shade. The latter usually creates more impact, but it’s a little harder to do.
MAMABELLA TIP
If you don’t know where your natural crease for these eyeshadow looks is, there’s a simple cheat.
Apply concealer along your upper eyelash line.
Look up, so this lash line and concealer touches your eye socket.
This will transfer parts of the concealer onto your eyelid where your eye naturally creases.
You can then use that as a guiding line for your cut crease.
P.Louise is the master of cutting the crease and the brand swears by using Vaseline on a tissue that is then placed over the end of a flat eyeshadow brush. You can then stamp the brush and pull it along the crease line smoothly before applying concealer, or a P.Louise base.
On YouTube, Nikkitutorials is the queen of the cut crease technique and uses it in a lot of her videos, so we thought you should learn from the best.
In the eyeshadow looks video below, she also only uses affordable products which is a bonus. Check out our guide to the best cheap makeup brands if this is something you’re interested in.
Nikki’s looks are pretty full on and if that isn’t up your street, you can just tone down the colours by using nudes and browns instead.
We’ve listed an easy way to find out where to naturally draw your cut crease in the box to the left, yet one of our favourite cheat products for this eyeshadow look is The Crease Piece.
It acts as a template for you to nail this look and makes it easy to get started with this technique. You can also use the side of a spoon…we haven’t managed to master this technique but there are tutorials all over TikTok!
 Angela Bright/YouTube
 If a full cut crease is too much, the Half Cut Crease is a great alternative. It’s also a good way to get used to the crease cutting technique involved in a full cut crease for when you want to take the leap and go all in.
The Half Cut Crease is our go-to eyeshadow look for almost any occasion because, no matter how many tutorials we watch, we’ve never managed to nail the full cut crease. We get the inner eye part looking great, yet the outer eye part always looks odd. The Half Cut Crease offers the best of both worlds!
As the name suggests, you start the process in the same way, and you cut the crease in the same way, but instead of taking the contrasting colour all the way to the outer edge of your eye, you blend it with a darker colour at the edge.
This is why this eyeshadow look can also be referred to as a Half Cut Crease and a Half Smokey eye. You don’t need to smoke out the edges, of course, but the overall effect is stunning. As the video by Angela Bright linked below shows. It’s a long tutorial but it’s worth watching because it teaches a number of hacks that we now can’t live without!
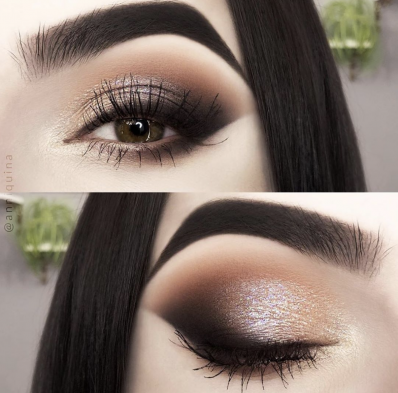
If you’re not quite ready to get to grips with the cut crease eyeshadow look just yet, try the halo. The image above is from the fantastic tutorial by An Nook.
It uses similar principles but is a little easier and less fiddly to deal (in our opinion) and it’s a fantastic way to make eyes appear wider and larger.
Start by defining the crease of your lid with a neutral tone. Apply a medium, and then a darker colour to the inner third, and outer third of your eyes and blend each time. Put concealer down the centre of your eye and apply a shimmer, or a lighter colour just down the middle. Repeat along your lower lashline, and ta-da!
mamabella tip: With any of these eyeshadow looks, you’ll likely need to apply concealer. Whether it’s along your brow line, or as part of your cut crease and halo.
For this, you’ll need a flat concealer brush. We highly recommend the Spectrum Collections Oval Concealer brush (£5.99), or the Huda Beauty Face Conceal & Blend complexion brush (£22). Even though the latter costs a fair amount, it doubles up as a foundation brush so you may save yourself money buying an all-in-one.
 Smitha Deepak/YouTube
 Blending your eyeshadow can be a make or break when trying to achieve a smooth and stunning eyeshadow look. However, if you’re a beginner, blending can be a little daunting.
We think this bright colourful rainbow eyeshadow look is fun and eye-catching and it uses such a great method that should have you blending like a pro in no time!
Start by neutralising your eyelids with a nude shade, we opt for using a concealer this gives a clean neutral canvas. Grab the most colourful eyeshadow palette you have and, instead of reaching for a makeup brush, apply these shadows with a sponge applicator.
With each colour you want to use to create this look, apply it at an angle from the top of your lid to your lash line. The lines will get increasingly shorter as you move from the outer to the inner corner. Don’t worry about the colours touching each other or overlapping. Keep doing this until you reach the outer part of your eye.
Now, grab a large and fluffy eyeshadow brush and blend two colours together at a time. This means simply tapping at the centre of the two colours, softening the edges of each until the colours leak into each other and there is no distinguishable line between them. Repeat for each colour pairing until you reach the last colour on the outer part of your eye.
The best thing about this eyeshadow look is you don’t have to have the seven shades, this can be a versatile look with using four or five shades. There is also a chance that even if you don’t have a full makeup brush set, you’ll have a sponge applicator in an existing eyeshadow palette, and you’ll have at least one eyeshadow brush. However, if you have neither we recommend this sponge eyeshadow makeup applicator (50pcs) (£3.99) and the Morphe M441 Pro Firm Blending Crease (£8)
mamabella tip: It’s all about being gentle and soft, make sure your blending brush is soft but still firm so that dabbing the shades together becomes a breeze.
Let’s face it, there are so many variations of the smokey eye, and even a sexy bronze smoky eye can be either edgy and glam or more of a blended golden look.
Regardless of which style you prefer, a sexy bronze smoky eye complements almost all eye shapes. It is an especially great technique for hooded eyes as it doesn’t have to be super precise and can be smudged as much as you prefer.
Use matte shadows and a good eyelid primer to make sure the look stays in place. This style also does wonders for monolids, to give you more definition across your eyelid.
The eyeshadow tutorial below will give an idea, but don’t be afraid to use it just as a starting point and make the eyeshadow look your own.
We’ve also got expert advice from our resident makeup artist, Victoria Howe. Her step-by-step guide to the ultimate smokey eye is below:
mamabella tip: We find using a large, fluffy blending brush on the outer corners helps create a deep and sweeping smoke. It’s not particularly precise but you can either leave it fully smoked out, or use concealer to create a sharp line that lifts the eye and accentuates the colour.
We highly recommend the £8 Morphe M518 Crease Fluff brush. In fact, we highly rate Morphe brushes generally.
Everyone loves a classic nude smoky eye. It’s probably the first of these eyeshadow looks that many of us first started to experiment with.
The classic eyeshadow look is achieved by adding a medium brown shade – or any dark shadow – in either a matte or shimmery finish (depending on your personal preference) to the entire eye-lid plus a slightly darker shadow in the outer corner of the eye.
Now blend, blend, blend with a blending brush to open up the eyes and accentuate your beautiful shape.
Almond-shaped eyes best complement this look, but really anyone can rock the classic nude smoky eye. If you’re unsure which blending brush to buy, check out our guide to the best makeup brushes.
You can accentuate the effect by putting a white eyeshadow or highlighter along the brow bone.
It differs from the deep smokey eye because the transition is more subtle. This makes is suitable for work or daytime events. You can then increase the intensity of the smoke for the evening to have a true day-to-night smokey eye.
Ombré looks are one of those eyeshadow looks that seem really tricky but they’re much easier than you might think. Ombré simply means when one colour blends into another. It’s a common term in hair and is equally found in makeup. You can have ombré lips, for example, as well as ombré eyeshadow looks.
The key to this look, as with almost every look in this list, is blending but at its most simple – brush a single, lighter shade across your eyelid and then add a darker shade in the outer corners. You can put an intermediary shade in the centre of your eyelid, but this isn’t always needed.
Once the two colours are in position, take a blending brush and blend where the two colours meet. Et voila!
This eyeshadow look isn’t too dissimilar to smokey eyeshadows looks and they can be paired with a cut crease, and a cat eye.
Sometimes a simple clean-cut perfect cat eye is all you need to make your make-up stand out.
Although finding the right-winged liner shape for your eye takes practice as it really depends on every single detail of how your lids are formed, it is a staple technique it is useful to master.
A cat eye with a darker colour in the corner of the eye definitely benefits close-set eyes the most as it balances out the eye shape.
For downturned eyes (that is when the outer corner droops slightly), it is best to go for a pearly shadow paired with a matte medium tone to blend and to top it all off the liner.
The cat-eye really complements downturned eyes as the eyeliner flick lifts the outer corners if angled well.
The video below might help, and one of our favourite cheat products, called The Quick Flick, takes the hassle out of the whole thing.
mamabella tip: If you can’t get on with liquid eyeliner, but you find pencil liners don’t offer a sharp-enough line, try using a flat definer makeup brush and a dark eyeshadow. We recommend the £6 Morphe Pro Flat Liner Definer. Dip the brush in your eyeshadow of choice and simply press the flat edge on your eye to create a straight line and build your wing. You can then smoke this line out, or use concealer to make it super sharp.
 L'Oreal
 This may not be a classic eyeshadow look but it has been growing in popularity in recent years and is a major trend for 2021. It’s called the feline eye because of the shape of the eyeshadow.
It resembles the Feline Flick created by eyeliner (which get its name from the shape of a cat’s eyes) and while it looks easy, it can be a bit tricky.
It’s a lot less fiddly than others in this list but you need to make sure you manage the shape and the blending.
Using a small, precise eyeshadow brush or applicator, dab the single colour in the shape that you want it before using a blending brush (such as the Morphe M441 Pro Firm Blending brush) to sweep and soften the colour around the edges.
Let’s get real: do you sometimes forget about your bottom lashes when it comes to an eyeshadow look? Or do you even choose to neglect them on purpose?
Well, for this eyeshadow idea you definitely won’t forget about them as it’s all about making the bottom half of your eyes pop with colour.
This is particularly powerful if you’re opting for a strong eyeshadow look (like the cut crease or the deep smokey eye) as it helps draw attention to your eyeballs.
If you use a colour that suits your eye colour, this will also make your eyes look bigger. Read more in our What eyeshadow goes with your eye colour? guide.
Making your lower lash line stand out with, for example, a tropical teal liner or a neon tone is especially great for people with deep-set eyes. If you don’t have much experience with experimenting with colour, we recommend watching this eyeshadow tutorial.
This is not so much an eyeshadow look in terms of technique, but more a section dedicated to eyeshadow looks inspired by the Pantone Colour of the Year 2022. A colour that has been named Very Peri.
Very Peri is said to have been inspired by the rising popularity in gaming, the metaverse and “rising artistic community in the digital space” and is a mix of blue and violet-red undertones. This makes it perfect for green eyes, while also helping blue and brown eyes pop. You can read more about this in our What eyeshadow goes with your eye colour? guide, as well as our explainer on colour theory.
So far, our favourite looks using this colour have come from our absolute fave makeup influencer, Mikayla Nogueira.
View this post on Instagram
And if you want to give this look a go, we’ve also found a tutorial that uses the Mikayla x Glamlite palette.
Sadly, the Glamlite range isn’t easily available in the UK but we’ve found three alternatives that range in price – the Morphe x Pony Constellation palette (£36); the Beauty Bay Bright 42 eyeshadow palette (£23) or the Morphe 9L Lavendaze palette (£12).
Round eyes can wear any eye makeup, but what looks especially good is some simple liner and white kajal on the waterline.
This is where a white pencil is used on the inside of your lower lashline. Prime your eyelid with a nice nude tone shadow beforehand and you’re good to go.
This doesn’t just work on large, round eyes. This is a look that suits any eye shape, especially if you’re feeling a little extra tired because that white waterline really will make you look fresh and awake instantly. You can also use a cream or beige eyeliner to make the impact less noticeable.
This tutorial is useful to help nail this look:
Raised between Germany and Italy, Nina is currently living in London studying towards a Masters in Human Rights at University College London and working as a freelance writer. She recently graduated from Bournemouth University in Multimedia Journalism where she wrote her dissertation on the representation of female political leaders in the tabloid media. Politics aside, she has a passion for everything fashion and beauty related